Getting Great Talking Head Shots on a Budget
There are many occasions when a company or business may need a small video clip but simply don’t have the budget for an external production agency to produce it. This is especially true when creating training video. In these cases the video can sometimes be successfully produced in house by company staff members. Many companies have access to a reasonable quality camcorder but often we see some basic mistakes made that could easily be avoided. Let’s take a standard brief or common requirement that companies often shoot in house and highlight a few areas to look out for.
Training video
“The company needs some very short talking head/interview shots for use as an online training video There’s no budget for an external agency so this will be shot in house using an available camera and edited by the companies own creative department.”
Here’s what to watch out for.
Lighting
Lighting is vital to film. It can be the difference between making a piece look flat and lifeless or rich, engaging and beautiful. But it’s also easy to run into trouble if you don’t know what to look for. If you’re shooting in house video there’s a strong chance that you will only be using natural lighting rather than film lighting.
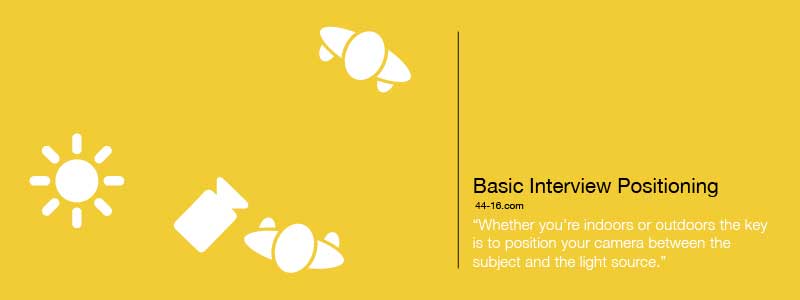
Whether you’re indoors or outdoors the key is to position your camera between the subject and the light source. The subject should roughly be facing the light source and the camera should have its back to the light source.
If you’re shooting indoors then you can either do one of two things. Use natural daylight from a window, or go with the internal lighting of the building. Avoid having a light directly above your subject as this will never flatter them. Instead look for areas of the building where the light source is to the front or roughly 45 degrees from the subject.
If outdoors never shoot with the suns position behind the subject. If you’re fairly new to using the camcorder and are shooting using the “auto” mode then shooting into the light source will make the subject appear very dark as the camera compensates for the bright light behind.
Ideally you’ll want to set the exposure first but if you’re a complete beginner then you may prefer to shoot on auto so getting the positioning right is important.
Sound
If you’re shooting using whatever camcorder you can get your hands on then there’s also a good chance you will be using the top mounted camera mic. These mics are never going to be as good as a clip, boom or handheld microphones but there are a few things that can help you here.
Firstly camera mics are very sensitive. They can hear a lot more than we can and they don’t have a brain to filter the noise or focus on what they want so if you’re shooting an interview in a busy office the mic will pick up everything!
Try to find somewhere quiet. Turn the air con of if possible, and close any windows to minimize background noise.
If outdoors be aware of the wind. Even a gentle breeze can cause wind rustle on the mic so try to find somewhere with a wind break.
Then position the camera close to the subject. To do this ensure that the camera is zoomed out as far as possible. Then physically move the camera and tripod until you get a nice head and shoulders shot. What your doing here is essentially moving the mic closer to the subject so that you can record a nice clean interview and help minimize any unwanted noises.
Time
There’s a good saying in film production that goes – You can have it good, fast or cheap…..pick two.
You’re probably shooting in house to save budget and it goes without saying that you want the film to be good. So the sacrifice production wise would be the time element acheter du vrai viagra. So allow plenty of time to setup, shoot and even re-shoot the interviews you need. Even a short interview can take time and the more you can allow, the better your results will be.
B-Roll
Rarely do employees or even board members deliver a word perfect sound bite that fits into you’re desired running time straight off the bat so some editing is always required. However if you’re cutting together like for like shots from an interview its handy to have additional footage to cut over the top so that your transition from clip to clip appears smooth.
Allow time to shoot some “cutaway” or “B Roll” footage. This is footage that you shoot for the purpose of editing and is always vital to training video as a way of illustrating what the subject may be saying.
If you have the time you could also shoot parts of the interview twice and shoot an alternative wide or close up shot to use as a cutaway in the edit.
Follow these simple rules and even a complete beginner should be able to generate footage to suit a basic training video brief.
To find out more about us and our services, please click here.


