Monthly Archives

January 2016

Video marketing blog – Lighting Advice

By Video Production Advice

Our Guide To Good Looking Lighting

If you’re making a film for your business or organisation there’s a pretty good chance that at some point the viewer is going see and hear someone talking. One of our goals is to share as much of our knowledge as possible in our video marketing blog so below is our guide to lighting for your corporate video or video marketing production.

Interviews, headshots, talking heads and vox-pops form a key ingredient of most corporate videos so making them look fantastic is critical. Below we’ve shared a few tips, techniques and tricks you can use to light and compose your talking head shot in order to get the best results.
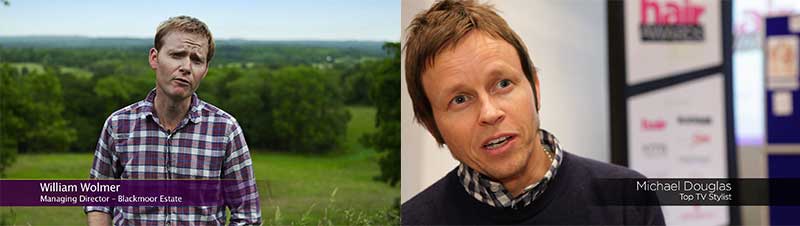
Natural Lighting

video marketing blog

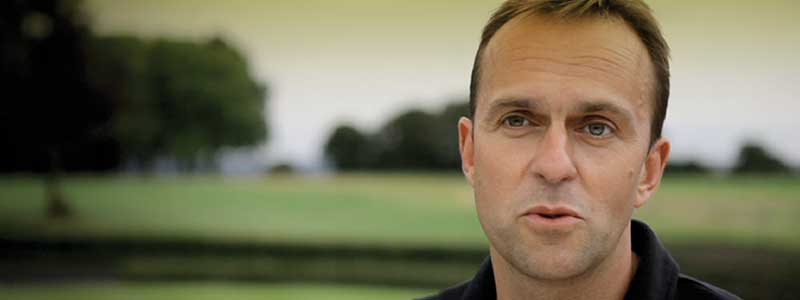
Exterior head shot using natural light and reflector

If you’re shooting outside and the general light is good then a simple reflector like we used in this shot gives you a warm light that should give you a very pleasant image. Gold reflectors work really well with human skin colouring and help your subject stand out a bit more. We’ve positioned the subject so that the natural landscape background also enhances the shot.

Simple Interior Shot With One Basic L.E.D Light

video marketing blog

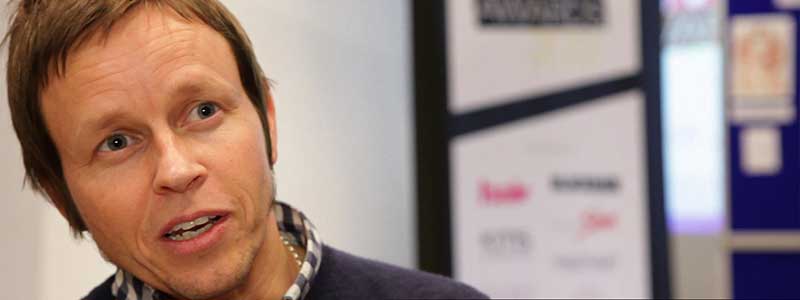
Internal head shot using natural light and small LED light

If you’ve got a good size room with lots of natural light then you can use it to your advantage (The right hand side of the room in this example had floor to ceiling windows). In this shot we positioned the subject on the opposite side of the room to the windows so that the natural light was softer and didn’t appear to harsh. A small basic LED top light was added to the camera to pick out the subjects eyes a little and we positioned the subject to use the colourful (and client branded) materials of a background.

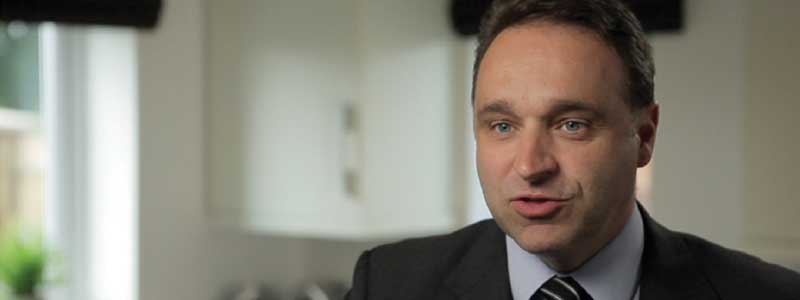
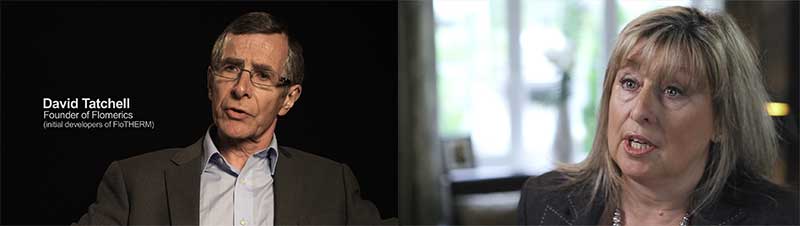
Classic 3 Point Setup

video marketing blog

Interior head shot with 3 light setup and black roll up backdrop

Adding a black backdrop to a shot can help establish the authority of the subject and create a dramatic image. To light this shot we used a very soft light with a reflector to add fill and a back light to give the subject some separation from the black background. Finding a good soft source light is essential to producing interviews shots with higher production values and most lights can be softened using a few tricks. The most common mistake is to place lights too near the subject and not allow the light enough room to disperse and create a softer feel.
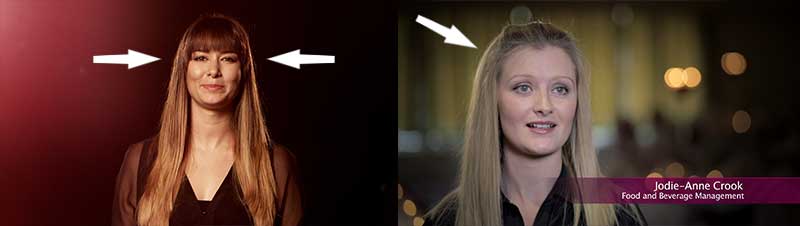
Flare and Beauty

video marketing blog

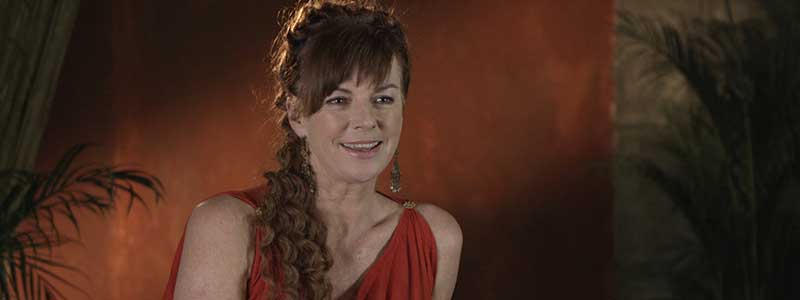
 Studio head shot with black BG and flare

Using a similar approach as the one detailed above (ie black background + 3point lighting) we angle our back light so that it creates a nice flare effect in the camera lens. To do this we simply angled the light in the direction of the lens more directly than we would normally do so. The effect gives us a warm halo flare which adds a nice tough of glamour to your shot.

Domestic Setting

video marketing blog

Interior head shot with 3 light setup

Interviews in homes can be tricky and care is needed not to produce an overly busy shot. In this example we positioned our subject as far from the background as the space would allow and lit him with 2 LED lights on stands. We used the natural light of the window to provide some interest and shape to the background and angled our subject to get the best out of the lights in a small working area.

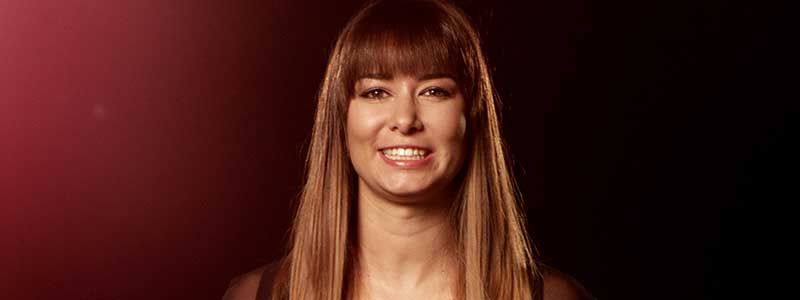
Internal Shot (Use Your Surroundings)

video marketing blog

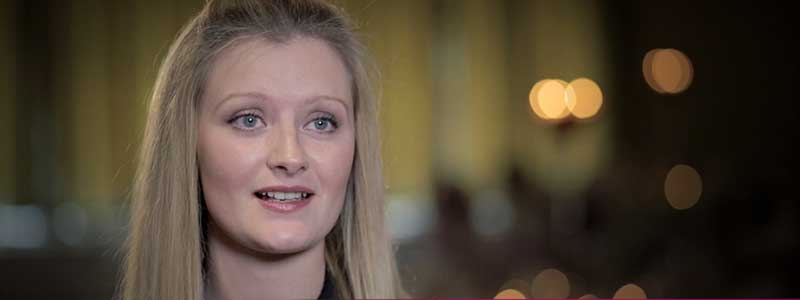
Internal head shot using existing location lights for background effect

When shooting in clients location (which we’ve talked about elsewhere good Video Marketing Blog) o look out for anything at the location that may provide interest to the shot. In this location the client had small tea light candles on tables which offered us a great “twinkly” backdrop effect to our interview shot. We used 3 lights to light our subject and you’ll notice a nice lokking halo around her hair which is achieved by a backlight set just behind and to the left of the subject.

Lighting the Background

video marketing blog

Studio based shot with a 3 light setup and additional lights on background

In this studio set up shot we were able to place our subject in front of a set. Once we’d lit the subject we then created some shape and interest to the background. We did this by creating a shaft of light (using the barn doors on our lights head) that cuts across the background and provides a shot with interest and shape.

General Tips

There are some very easy mistakes to make when shooting talking heads so here are our top 3 general tips that should help you shoot great looking interviews and head shots.

1 – Separate subject from Background

Don’t stand your subject too close to anything in the background. Position them well away from room walls or similar to give your shot some depth.

2 – Softly Softly

Mentioned above – we cannot stress the importance of using a lovely soft light when shooting head shots. You’ll make your subject look their best and produce beautiful looking images.

3 – Light the eyes

Whether using natural light or artificial ensure that your subjects eyes aren’t in shadow. If you’re filming outside and the sun is over head think carefully about position and examine your surroundings to see if there’s any shade you can make use of.


Hope fully this additional to our video marketing blog has been useful but do drop us a line if there’s anything else you’d like to know as we’re always willing to share our expertise.

To find out more about us and our services, please click here.

Videography Tips – What makes a better corporate video?

By Corporate Video Production, Video Production Explained

Videography  – A Guide to Grip

Videography for business is huge these days! It seems everyone is producing videos for their business, so it’s important to make sure that your production stands out above the crowd and feels slicker, better and more polished than your competitors. This is essentially all down to “production quality” which we’ve talked about in other blogs. But what videography tricks can you use to lift your film into a higher realm and add polish that will leave your competition drooling! Well one answer is to use grip within the production of your film. But “what the devil is Grip?” I hear you say!

Well, grip is essentially a device that moves the camera whilst shooting. By doing this you are instantly able to produce shots that have a much higher production value and that take on much more of a Hollywood feel!

There are several different types of key grip to choose from out there, these being, Slider’s, Dolly’s and Jib’s.

Sliders

Sliders are a small-scale grip, which are best used for creating short movement from, left to right and vice versa. They are essentially a bar or track of about 1 to 1.5 meters in length that can be attached to the top of a tripod. The camera is then able to smoothly glide along the track creating a beautiful moving shot that is very useful. They are usually lightweight and cost effective enough to be used on even smaller videography budgets.

videography

Slider capturing some great images

Jibs

Jibs are counter weighted cranes that the camera can be placed on allowing it to smoothly travel vertically into the air . They are great for achieving truly fantastic sweeping shots from high to low angles. There are 2 main types, the mini jib and the full size or “jimmy” jib.

videography

Mini jibs are ideal for interior shoots.

Mini jib’s are perfect for interior shoots where you may not have a lot of room to operate. These are also good for a small crew (or small budget project) as they are easy to set up and can be operated by one person. Even though they are small they can produce some wonderful sweeping elevated shots and add a great deal to your film.

The full size jib or “Jimmy jib” is basically a much bigger version of the mini jib and can extend the camera upto much greater heights. This can produce spectacular sweeping shots and is perfect for outdoor, landscapes and building footage. However, these take time to set up and usually require several crew members (at least 2) to operate. A full size jib also requires a higher budget but if you’re looking produce footage to delight your audience and to set your piece apart from the others, then you couldn’t find much that will do a better job than a Jib.

videography

A full size jib at work.

Dolly

Then finally there is the dolly. Dolly’s are a great way to capture smooth, fluid like motion in your footage. They allow the camera to travel along rails or track for greater distances than the “slider” and can produce a wide variety of impressive shots. These, like most grip, have different variants. There are small lightweight Dolly’s such as the Hollywood Dolly, which are fantastic for small interior shoots as they’re portable, easy to set up and very cost effective. However you need a really smooth surface to get the best shots out of them and you’re limited to traveling in a straight line.

videography

Videography Tip – The Hollywood Dolly (left) is ideal for quick paced shoots, whereas the track and buggy dollies (right) are brilliant for studio shoots.

The heavier track and ride on based options offer much more flexibility. These are essentially large scale train tracks that can be laid in straights or curves and come with a small buggy that is placed on the track. This dolly is brilliant for studio shoots but it takes several crew members to set up. It delivers ultra smooth movement and with the curve track it offers great way to produce gliding shots that can circle your subject. Again though this higher end option comes with the budget you’d expect so it can be limited to larger projects.

But producing beautiful moving shots should be within reach of most corporate videography budgets and will positively impact the overall quality of your film.  Be brave and consider adding this into your next project and I’m sure you’ll be delighted with what you can produce.

To find out more about us and our services, please click here.

Media Production Advice – Recording Better Sound

By Video Production Advice

Better audio means better media production

Sound is incredibly important to any video or media production and if it’s done wrong, no amount of post-production will correct it. Getting the sound right on shoot is critical, it doesn’t matter how beautiful your images are, if the sound is not upto scratch it will directly impact the perceived production quality of your film (and therefore your brand) significantly. There are several different types of microphones you can use and knowing which one is correct for the job is important. However in the world or corporate video marketing there are essentially 2 types of mic that are the most frequently used.

Clip-On Microphone (Sometimes Called Lavalier, Tie-Clip or Lapel)

Clip on mics are very common for talking head interviews, and for small crew media production shoots. The benefit of these is that they are small, easy to hide on the subject and do a fantastic job of picking up the audio. They are also easy to carry around and can be set up and used quickly by the camera operator allowing you to use a minimal crew.

The Speaker simply places a radio pack in their pocket or somewhere that can’t be seen and then the microphone is clipped on at around chest height. It’s important to make sure that you hide the cables as these can look rather ugly, so we suggest that you run the cable under the shirt or jacket of your subject. The only downside to this is that they will pick up some fabric rustle if they move too much, so having someone monitor the sound as its recorded is important.

media production

In some cases, a boom microphone may be more appropriate. This is not always the case.

Boom Mic (Also Referred to as a Shotgun Mic)

A boom mic is a microphone usually attached to a long pole and held by a boom operator, or if no movement is required then they can be placed on a stand. These mics are a lot bigger and usually hover somewhere above the speaker out of shot. They are incredibly useful for directional sound, which means that if you point it in one direction it will only pick up the sound that it is aiming at. This is excellent when you have to follow a speaker or film outdoors and helps ensure that all you record is the dialogue and not the sound of whatever else is happening in that area. The only drawback to these is that you need an extra crewmember to operate them, usually a dedicated boom operator who will monitor it at all times.

Environment

Location and environment can be an important factor in media production. You’ll ideally want to avoid places that create too much background noise if you need to focus on a speaker. You’ll also want to be aware of wind noise if shooting outside. When filming indoors just remember that the aircon can also be your worst enemy. If possible ask the venue to turn the Aircon off, however if this is not an option do monitor the sound to ensure that you’re not picking up unwanted hum from the location’s Aircon system.

media production

A sound desk for multiple audio sources.

Now the point of this post is not to prove that you need to spend thousands on sound equipment for media production. In fact the audio part of most budget is a very small portion unless you’re recording live music. However don’t dismiss sound within your production as the impact it has on your final video will be important.

In a nutshell the viewer won’t notice “Good” sound recording but you can bet your house that they’ll instantly pick up on bad sound!

To find out more about us and our services, please click here.

How Important are Location Recces?

By Video Production Advice, Video Production Explained

Our Tips To Get The Most Out Of Your Recce

A “recce” (abbreviated from reconnaissance) is essentially visiting a shoot location before filming to assess its suitability for shooting and is vital to ensuring your shoot day goes as well as it can. If you have a video production project on the horizon and you’re wondering what to look out for here’s checklist of what to focus on when doing a “recce” of any location you may want to film at:

Health and Safety

The number 1 reason for doing a recce is to access how safe the location is going to be. The last thing anyone wants on shoot day is equipment (or worse, people) getting injured or damaged. You’ll need to look at access–especially if there’s lots of loading to be done–and the space in general to identify anything that could be a possible hazard.

Logistics

Something you have to consider is how much space do you actually have to work in? If it’s a small area you may have to restrict yourself to just the bare essential pieces of equipment and plan where they need to be set up. Also you’ll need to know how you’re going to get all the equipment in there. If you’re going to be doing a lot of moving around will it be worthwhile in investing in something to help move the equipment or an extra set of hands?

Corporate Video Production

Weather

If you are planning to film outside it’s essential to take into consideration the weather. Check the long range forecasts and consider how the weather may affect your shoot. Can the shooting be done if its raining?, windy?, snowing? Even on really sunny days you may need to plan for such things as too much light and how to compensate for it.


Lighting

It is important to review how many lights are going to be needed to light your location. If you’re inside consider the windows and that amount of natural light that will be in the room. You may discover that you have a lot of windows that may need diffusing or blocking, so measurements will need be to taken so that you can precut everything that’s needed, saving time on the day.

Corporate Video Production

Props

Sometimes when doing a recce you may find something there that you never considered before, that would look great as a prop in your fillm. Likewise, you may realize extra props or set pieces are needed to further dress the location.

Efficiency

Shoot day efficiency is key and something that your client will appreciate. One of the big benefits of performing a reccc is to figure out where lights, cameras, props will need to be beforehand saving vital time on the shoot day. This ensures that people aren’t waiting around for longer than is necessary and you can get straight to the shooting.

Power

Something that can easily be overlooked is the amount of sockets available for lights and cameras and any other piece of equipment you want to use. Also the type of power available will be an important factor to establish. We’d also suggest establishing the tech specs of the power ring/circuit you will be using to ensure that you don’t overload the system. Always enquire into how the location will charge for the electricity used and at what rate so that you don’t get any nasty shocks on your final invoice.


Corporate Video Production

Catering

Don’t overlook the importance of having a good spot to make tea and coffee! Film crews need to be kept hydrated and they can be known to consume record amounts of tea!
If you are catering for a larger film unit consider whether you are able to get food delivered to location or source it locally.

What else happens around your location?

It is very easy to forget that sometimes the outside world can affect your location. For example you may have an interior location booked but didn’t realize that a train line runs directly behind, or that it is under a flight path. Overlooking elements like this could result in unwanted noise levels that can make filming difficult and time consuming. Likewise for exterior locations you will want to find out if anything is happening around on the day or nearby. For example  – On one occasion we turned up for an outside location shoot only to discover that the army were training (blowing things up!!!) very near to us!


Clearance

Finally check that you have the correct clearance for filming at your location? You should always try to have a location agreement in place before you shoot and have a copy with you on shoot day for good measure.

To find out more about us and our services, please click here.

How can I get a job in production?

By Video Production Advice

Our Latest Recruits Comments On Getting A Job

Working within the video production sector can be hard work but it’s also very enjoyable and rewarding. You will work on a wide variety of projects and possibly travel to various exciting locations to do so. It’s therefore no surprise that a lot of people would like to work in the industry. We get dozens of letters and application each week from graduates and professionals looking for work. So we’ve asked one of our new recruits Richard Willis to share his thoughts and experiences about how to get into the industry to help anyone looking to make that step. Here’s what he came up with;

“Finding work within the production industry isn’t easy. You have to be tenacious, determined, hard working, enthusiastic and above all, passionate. It is something you really have to stick with, but in time it will pay off. Here’s a few a pointers that I think we will help you along the way.”

Skill Set

“In today’s world it isn’t simply enough to just be a cameraman, or a director, or an editor. You have to have multiple skills under your belt to help you stand out from the crowd. A young cameraman who doesn’t know how to edit may struggle, likewise an editor who can’t produce basic motion graphics, or a director who can’t produce. Clients and employers now expect you to offer a bigger skill package.

“So the key thing is to never become complacent with your skill set, always look on expanding it and developing new skills to help you become invaluable to a production company.”

Build Up Your CV & Showreel

“It is important that you have an impressive CV  or showreel. Production companies get inundated with applications everyday, and there just isn’t enough hours in the day for them to fully view each one. So it is vital to have something at the very beginning of your showreel/CV that will immediately grab their attention and will make them want to keep reading/watching.

“It’s also important to keep building up your experience. So in your spare time volunteer for projects, not only can you add them to your C.V. but there is a good chance that you will make connections that can lead to future work. So be active, make your own projects and impress people.”


entry level video jobs

Our new recruit Richard hard at work.

Put yourself out there

“Determination is key, you shouldn’t be afraid of sending out emails to every company, giving them phone calls and making yourself known. That being said there is a fine line between reminding a company about you and hassling them, you don’t want to be constantly ringing them up every day.

“Create an online presence for yourself, websites such as Linkedin, Facebook, Vimeo, Pinterest and Google+ are all tools at your disposal to help you stand out to find new contacts and work.

“Another essential thing is to network, make friends with like minded people and stay in touch with important contacts that you meet, there’s a saying “it’s not what you know, but who you know.” and this can be very true.”

Make it personal

“When contacting companies make sure you personalize your approach and whatever you do don’t send out a group email, you’ll have only a very slim chance that anyone would ever look at it. Your emails should feel personal, mention their name and something about them if you can. Also make sure that your grammar and sentencing are correct. This is unbelievably important.

“Hopefully some of these tips will help you find your way out there.

“Good luck!”

Richard.

To find out more about us and our services, please click here.

What is Video Post Production?

By Video Production Explained

Video Post Production  – A Guide To Everything That Happens After The Shoot

Video production agencies quotes shouldn’t be baffling or require a handbook to understand. But more often than not the line in the budget marked “video post production” is rarely broken down into line by line items. So in the interests of clarity we’ll try and explain the process of what work is required to produce a corporate or promotional video once the filming part of the process is complete.

File Management

Pretty much every professional promotional video is shot to file based digital media. This is not a great revelation and I’m sure you’ll have devices that shoot film or photos to digital formats at home. Depending on the type of camera you have used to shoot your footage the sizes of these files will vary. The higher the quality of the final picture, the larger the files will be.

So the first part of the video post production process is to transfer these digital files onto the editing system that is being used. This is as simple as dragging and dropping but if you’ve been shooting over a long period of time then your files sizes could be huge and will take time to copy or transfer to the editors system. So this part of the post production stage can take a few minutes, a few hours or even a few days. While this transfer is in process the computer that is doing the reading and writing cannot really do much else effectively so you should expect to be charged for this time.

Once the files are onboard the next stage (depending on your editors workflow) may be to transcode the footage ready for use. Unfortunately all cameras don’t record to the same format. The files they create come in many a different flavours, some of which are quite user friendly, while others require conversion to effectively change the language of their files structure.

video post production

These files are video clips direct from the camera, some editors may need to transcode these for use.

Once this is done the editor is ready to start work.

First Cut

With promotional and corporate videos there is a high chance that some of the material you are working with will be interview or talking head material. This interview material can sometimes form the entire narrative drive of the film or sometimes it will be intercut sporadically with pre-scripted Voiceover.

As much of the flow of the video will come from either the voiceover or the interview comments it’s usual for these to be the first elements that the editor works on. An editor may go through all the interview clips and select a shortlist of the strongest clips to form the basic bones of the film.

A guide track of the musical soundtrack may also be added to the film at this point just to get a feel for tempo and duration (although this may be changed later). Once the initial selection of the strongest clips is complete the editor will start to create the first cut.

If a voiceover is being added and the script has been approved this may be recorded at this stage and added to the first cut.

Any graphical or animated content will be created, produced added in at this stage to further enhance the presentation of the whole film.

video post production

The edit carefully checks sound levels for voice and music.

Once the first cut is complete the production company/editor will send it to the client (you) for feedback and comments. Prior to starting the project, the production company should have agreed with you a workflow plan for this part of the video post production that efficiently progresses the project towards completion in the most suitable timescale timescale. If multiple people will be feeding notes back on the film then is advisable to select someone to collate all the changes/amends/comments into one batch so that the editor can efficiently apply all the tweaks in one re-edit (this will certainly save you money).

Sound, Colour & Compression

When the final edit is approved the production company will then start mastering the film. Firstly the sound may need properly balancing and mixing so that everyone featured in the film feels like they are talking at the same volume and that all the vocals (either script or from interview) are properly mixed into the musical backing to ensure that both elements can be heard at suitable volume levels.

Next some colour correction will usually be done to ensure that all the shots used in the film have the same feel in respect of colour, contrast and tone.

Finally once these steps are complete the film will be compressed for delivery. Most good production companies should supply you with a range of formats and sizes of your final film. Alongside your HD master it’s useful to have several smaller versions that come ready optimised for web use so you can upload them straight to Vimeo, Facebook or Youtube etc if desired.

And that’s about it really for video post production. Yes, there are a few more complexities than highlighted here. Depending on your project one of the steps above could take a lot longer than the others depending on its importance to the project, but hopefully this gives you an overview of where you production budget goes in regard to the line in the budget marked “post production”.

To find out more about us and our services, please click here.

Successful Video Production for Schools

By Video Production Advice

Video production for schools – The Key Techniques

Producing video for any business, organisation or individual often requires a unique and tailored approach. Companies, businesses and organisations all have different needs and also very different ways of working. The physical logistics of producing video for them will vary from project to project so it’s important that as a video production company we can respond and react accordingly. This is never more true than when we undertake video production for Schools , colleges and universities.

So if you’re a school or college producing your own video project or an agency working for a school/college client here’s some helpful advice and tips based on our experience gained throughout a few very busy years in this sector.

1 – Planning (lots of it!!!)

When approaching video production for schools we’d suggest scheduling twice as many pre-production meetings than you would on an equivalent corporate video shoot for a company or business. This is due to the challenging nature of filming within schools and will allow you and the client ample opportunity to cover all concerns or considerations.

2 – Safety

One of the obvious factors is safety. If you’re moving video equipment around a school building you need to ensure that it’s done safely and with zero risk factors. This element may influence your filming schedule for each days shooting. A good approach is to do any kit moving either at break times when the school building is quiet or when all the students are in class.

Conduct a thorough safety assessment prior to shooting to check you are aware of all potential risks and hazards that filming may create. Once you are confident that the shoot is safe, you can focus on capturing the engaging film content that will make the final film a success. There are a number of ways you can achieve this.

3 – Camera Choice

Video production for schools is perfect for cameras that can be built with a small form factor. Taking a huge great studio camera such as a Sony PMW700 into this type of shoot simply doesn’t work. The size of the camera would present issues when moving around, but more importantly the reaction that younger children have to a large camera like this means that you get very little honest footage as everyone in the room is constantly camera aware due to the physical size of the kit.

A better approach you could consider is to use either a DSLR type camera (5D etc) or a RED Dragon with minimal build. These 2 options give you a lower key camera that can be used a lot more subtly to capture footage of students that has a natural feel.

video production for schools

Using a more compact camera allows you to capture natural moments like this.

4 – Capture the Joy of Learning

For video production for Schools to really work you need to capture some moments of wonder on the student’s faces as they learn, and have fun in school or college. A great way to do this requires a structured approach and a slight element of staging. That’s not to say that you won’t be capturing real moments – you’ll just be doing it in a way that ensures you work efficiently and effectively.

This is achieved in the following way, – (here’s the brief – You need to get some shots of a great lesson in action – you need to see the teacher explaining and the enthusiastic responses and expressions from the students)

To do this set up at the rear of a class and observe the lesson for a few minutes. Once you identify the part of the lesson that gets the desired response from the students you should then position the camera where you know we’ll get the best images.  Then ask the teacher to re-run that few minutes of the lesson a couple of times. You can change the camera position to give multiple angles and with a little direction and encouragement you’ll get the shots you need.

5 – Shoot at the Children’s eye level

Another great tip is to always shoot at the students eye level, especially when woring with younger students. This brings you into their world and allows you to really capture them engaging in their work and activities. You’ve also got a much better chance of capturing one of those “moments of magic” if you’re shooting at a lower height as your closer to the subject and action.

video production for schools

Filming at the eye level allows you to capture “moments of magic”.

6 – Expectation

If you’re planning to include lines, script, or interview comments from the children in the films you need to very flexible in your approach. Working with younger Students can be very unpredictable so have a good idea of what you are looking for vocal wise but also have a back up plan.

7 – Crew

It’s really useful to pick a crew who either have children or who have experience working with younger people. Getting the best results will rely heavily on how comfortable the students feel around the crew (especially if doing interviews) so using a director and camera operator/s who have good rapport with children is vital.

8– School Staff

It goes without saying that teachers are VERY busy in their working day. If you’re planning on shooting teacher interviews then schedule these after the school day is finished and focus on getting the action shots during the normal hours.

9 – Shoot outside

This sounds obvious but once school children are in their school yard or outside environment they tend to really let off steam! It’s a great opportunity to capture great action footage of them at play and will make a great addition to your final edit.

video production for schools

10 – Be Low Key

Finally, your goal when undertaking video production for schools should be to create a tailored production plan that will successfully realize the brief set while maintaining zero disturbance on the ground (ie in the school). If the children within the school get too over excited by having a film crew on site then your whole shoot plan could unravel pretty quickly. So keeping a calm and low key approach goes a long way to getting the most from the available shooting time and capturing the joy of learning effectively.

To find out more about us and our services, please click here.

Whats the best way to shoot large areas?

By Video Production Advice

How To A Shoot Big Area

Every project brings it’s own particular challenges which are dictated by the subject matter. For example the skill set and technical equipment that we need to bring to the table to shoot a Formula 1 film would differ greatly from those that we would require to shoot a 5 storey building or a series of interviews. It’s important to us and our clients that every production is handled in a way which is appropriate to the material required and that the dynamic of the shots produced suits the end product.

Getting The Right Crew

Your production company should assemble the crew for your project based on your particular brief (in very much the same way that a cast of actors is assembled for differing movies requirements). You should also expect your production company to have a solid foundation of its own in house producers, directors and editors, but the remainder of the team may hand picked from a pool of expertise to suit your shoot.

A great example of this was a recent project where we were asked to produce a film to introduce and showcase the strengths of what was, essentially, a sprawling industrial area in the midlands! Now industrial areas by their nature aren’t the most pretty of things to capture on film so we needed to capture footage that conveyed the dynamics of the site and its busy day to day nature. We also needed to produce the film in such a way that enabled us to shoot shots of the different industry types on the estate and convey their unique attributes in a few seconds of footage. On top of these challenges the client had a super tight turnaround schedule that would only really give us one day of shooting to cover a truly vast area.

aerial-shot

Our solution was to use 2 camera units working on different areas of the site at the same time. One of the units was a standard tripod/ground shot with a small dolly to add movement. The other was the 30 foot jib crane which we’d spec’s up with a RED epic camera to really give the client some sweeping hero shots of the estate.

Aerial Shots

Aerial shots are essential when filming any landscape, grounds, or external area. Without them any large scenic panoramic type shot looks flat and boring if simply shot from the ground. I would guess that everyone of us has taken a photo of a beautiful vista or landscape whilst on holiday only to be hugely disappointed that the printed photo that we took didn’t look anywhere near as good as the real thing. This is because filming or photographing landscapes from the ground always gives us flat (dull) results that never really do the actual scene justice. In order to truly show landscape and scenery we need to get the camera up into the air.

As soon as we elevate the shot (even by a few feet) the scene starts to look instantly better. If we can then sweep the camera from low upto heights of 30 ft or more then we really starting to get something beautiful (even on an industrial estate!). A great example of this can be seen in any of Peter Jacksons helicopter shots of the New Zealand landscapes used in The Lord of the Rings trilogy.

Forward Planning

We planned most of the shots prior to shoot using the site plans and the magic of google earth and along with a dawn patrol recce we were able to schedule all the shooting for the day very tightly. The 2 units were able to work in tandem to ensure we got the right type of footage at all the different locations the land area had to offer and that the project was delivered successfully.

To find out more about us and our services, please click here.

Business Marketing Videos – How To Shoot Great Interviews

By Video Production Advice

A detailed how to look at setting up a great interview

Shooting a good talking head or Vox Pop interview shot is pretty much essential when creating Business Marketing Videos. If you are producing material for a promotional video, corporate film or content marketing then there’s a very string chance that at some point you will shoot a talking head. Talking head shots are used often in corporate videos because they are an effective means of getting important information to a viewer in a personal and friendly way. Quite simply, they put a friendly (mostly) face to a large corporation and create a personal connection to the viewer. So if you are considering filming a talking head for your businesses video then there are a few things you should consider to ensure that they are as effective as possible.

Where should your interviewee sit in frame?

When setting up for a talking head interview there are 2 main ways of positioning your subject, they can either look directly down the lens or look just off to the side as if talking to someone off camera in an interview type scenario.

The first approach gives you a very personal feel as if you are directly talking to the person or viewer. However, this can sometimes be a little bit intimidating for your subject and may affect their delivery. Not everyone is comfortable talking to a camera lens.

An alternative approach is to have the subject talk just off to the camera to a 3rd person creating an interview type scenario where we never see the interviewer. We prefer this approach for a variety of reasons. Firstly it produces a friendlier and honest feel to the messaging, the viewer feels that they are listening in on part of a conversation and as such the presentation of the footage feel a lot less “hard sell”.

Another important advantage is that this approach also helps the subject deliver the lines in a more relaxed and natural way, producing footage that feels much more engaging.

Business Marketing Videos

A subject looking into the lens (left) has different tone when compared to a subject talking addressing an interviewer beside the camera (right).

Something else to consider is the placement of your subject and the composition of the shot as a whole. For example you could have them directly in the middle of the shot (again a more personal feel) or offset to the side. Having them offset slightly does help if any text or graphic is being overlaid later.

If you have a long piece with lots of different speakers then try having half of your subjects on one side of the camera and the rest on the other side. This will allow you to mix the shots in the final edit which will produce a smoother final film.

What should be in the background?

One of the most important factors you have to take into consideration is the background as this can set the tone of the overall footage. Try to select a background that provides an interesting and appealing overall image. Avoid selecting backdrops that are too cluttered or busy and also avoid positioning your subject too close to walls (this will create a very flat, boring image)

Make sure the background you select is “clean” and that there isn’t anything in vision that will jump out at you once you view the final footage. A lot of talking head work is location based and often takes place within offices, so watch out for coffee cups, coats, loose paper, and general clutter in the background that can make a shot feel cluttered and distracting.

Business Marketing Videos

A dark pull up backdrop can look dramatic (left), if you chose not to use one, make sure your background is “clean” (right).

Also consider whether you would like to use a pull up backdrop? Shooting interviews against a black or white backdrop produces a professional and clean looking image that instantly elevates the messaging and can add a touch of drama.

Creating a shot with depth (ie pushing the background out of focus) also helps your subject stand out and adds some production quality to your film. It is also useful if you don’t have a great background to work with. There are many ways to do this but using a high quality camera and lens is the starting point in achieving this look.

How important is light?

Finally lighting is extremely important to consider when shooting Business Marketing Videos. If you’re producing the film in house then be aware that lighting can be tricky and time consuming. When done well it will create an even and interesting shot, however when done badly it can ruin your whole film!

You really want to make sure your subject pop’s out of the image. To help achieve this you should ensure that their eyes are light correctly, and that you have a light place behind them (shining at the top or side of their head) to help them stand out. See more on this in our lighting guide.

Business Marketing Videos

Lighting the back or sides of the head creates separation from the background.

Just remember that it can take time to set all this up and (if possible) you should allow at least a good hour before the interview begins to allow your team to set up.

This may seem like an awful lot to remember if you’re producing your Business Marketing Videos in house but often these small touches make a huge impact on the final quality of your film and ultimately the way on which your brand is perceived.

To find out more about us and our services, please click here.

How can I Legally Safeguard My Corporate Video Production?

By Digital Marketing, Video Production Advice

A Guide To Copyright, Royalties and Content Ownership

Producing a programme that will be sold as a dvd/blueray/download or watched on TV presents a set of unique challenges that can often be applied to corporate shooting. In the past we have produced Sports/fitness, Live music dvd content, and comedy content for clients such as Universal pictures and ITV2 and to say that these productions have to be “watertight” is very much an understatement.

TV and DVD

Because these productions are sold as part of a dvd package or broadcast (along with adverts) for commercial gain absolutely everything seen and heard within the programme can legally be considered part of a revenue generating vehicle. What this means in real terms is that anyone and anything featured in the final footage has sign legally binding release forms giving the film maker absolute commercial rights to the footage and audio captured.

This also applies to footage of buildings and land used as either cutaway material or in the background of the picture.  We therefore need to sign off every location we shoot to release the image rights.

Music Publishing

In addition every note of music has to be cleared not only by the record companies who own the (physical) recording, but also by the publishers (and ultimately writers) who own the words/music. Weirdly enough sometimes the band or artist sometimes don’t even come into this!

What I’m aiming to illustrate here is that if you intend to use your film for commercial gain, you need to think carefully about what you want to include and allow enough pre-production budget to obtain the required release agreements.
This applies just as much when producing content for corporate film or promotional video use and is not just applicable to TV. If you’re allowing your company film to be seen online then you are effectively “exhibiting it” and hence you must own exhibition rights to everything featured in it.

legal-safegard

So,

• If you want you film to feature some great interview comments from your customers ensure you get legally binding releases signed by them at the time of shooting.

• If you want to include some footage of your product/service in action make sure you gain permission and release for the location in which it is to be depicted.

• If you’re filming general “wide” shots of your business with customers on site you’ll need to display clear signage informing them that “filming is taking place today”. You also need to ensure that these shots are general wide shots and could not be descried as “featuring” a specific person (ie – no close ups). Any close up (or “featuring”) footage of the public requires their permission and a legal documet signing.

And if you’re planning to use Take That’s latest hit as the soundtrack for your corporate film you better get permission in advance and be prepared to write a 5 figure cheque.

Get it right – before you shoot

However, don’t be put off by all this as it’s not as daunting as it sounds and the public are reasonably familiar with the concept of a “image release form” thanks to the amount of filming that takes place throughout the country.

The upshot of neglecting these aspects is that someone could legally request that you remove your film from the web and not exhibit it anywhere else. This is hardly the sort of thing you need after committing time and money to producing your new corporate video.

At the end of the day, if you’re watertight on this sort of thing you can distribute your film to effectively and freely and without worry.

To find out more about us and our services, please click here.